See:
Cause Rhododendron and azaleas can be propagated by cutting a vegetative shoot from a stock or production plant, sticking it into growing media and allowing it to root under high moisture conditions (misting or enclosed in plastic) before growing on to a full salable plant. All too often the cuttings do not produce roots and subsequently rot. The OSU Plant Clinic has found several fungi involved with rhododendron cutting rots including Rhizoctonia sp., Fusarium sp., and Cylindrocarpon sp. Some cutting rot samples also have no organisms involved. Foliar fungal pathogens, such as Pestalotiopsis sydowiana, can also complicate matters by colonizing leaves that are cut back to reduce transpiration.
Many of these are soilborne fungi that are favored by cool, wet soil and/or media. They can become a problem if growing media becomes contaminated or a pathogen is introduced on cuttings or in irrigation water. These fungi are able to survive for various periods as resting spores or as mycelium in soil and residual host tissues. They also can persist in old, reused containers and trays.
Management of Cylindrocladium blight by immersing azalea cuttings in a fungicide or disinfectant solution for several minutes was recommended for many years. Unfortunately, a few contaminated cuttings can contaminate the entire batch resulting in widespread disease and cutting failure. A similar situation can happen when dipping cuttings in rooting hormone. Again, if a contaminated cutting is dipped then all succeeding cuttings dipped into the same container/solution may become contaminated.
There are many reasons for cutting failure that can lead to pathogen colonization. Time and placement of shoots selected from the mother plant, excessive misting, wounded cuttings, dibble holes larger in diameter than the cutting, as well as wilted cuttings that do not hydrate are all factors. Cutting may wilt due to extended shipping or storage duration, cutting boxes that are not full, slow handling on the sticking line, delays in getting cuttings to the bench as well as dry, sunny or windy environments.
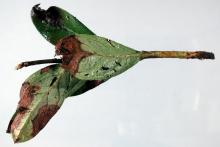
Symptoms Cuttings fail to root or even produce callus on the lower-cut end. Stems become water-soaked, turn brown and necrotic. The rot may be slimy or firm depending on the predominate organism involved. Once stems rot, the leaves may wilt, curl, or turn chlorotic (yellow) before becoming brown and necrotic then falling off. Leaves may also develop a brown necrosis starting at the leaf's cut edge indicating fungal infection of the leaf.
Cultural control
- Use tissue cultured plants (if possible) to avoid the problem altogether.
- Take cuttings from field plants above the splash zone. Rain and irrigation can splash soil particles as well as microorganisms onto plants.
- Do not take cuttings from obviously or subtly diseased plants.
- Take cuttings in the morning and/or after irrigation when they are more fully hydrated. Avoid hot weather.
- Select cuttings from shoots without flower buds and/or lateral shoots. Lateral shoots generally are more rootable than terminals. Flower buds are generally inhibitive.
- Use sharp tools to remove cuttings, buds or leaf tissue. Clean tools and soak in disinfectant. Use two tools so a worker can trim or cut with one while the other soaks. When done with a batch, cultivar, etc. switch one tool for the other and allow the used one to soak.
- Saturate media 24 hr before sticking, it should be uniformly dark brown to black and shiny (although there is a lot of variation in color with different media).
- When getting cuttings from another facility, make sure cuttings are well hydrated and if not, hold, unpack and keep cuttings in foggy, humid conditions. While handling, cuttings should not be out of high humidiy conditions for more than an hour.
- Make bottom cuts through nodes to help stimulate meristematic activity. Make all cuts of stems or leaves with clean sharp tools.
- Rub off indumentum on stems to improve contact with rooting media and tomentum on leaf surfaces to keep them dryer.
- Disinfect the storage facility, before cuttings come in, with peroxides or quaternary ammonium products. Disinfect the sticking area before work begins and frequently while sticking. Disinfect carts, benches, and any containers that come in contact with cuttings. Clean the floors at least once a day.
- Use disposable gloves and aprons for workers.
- Use disposable containers for hormone and use a new container every time it needs to be refilled.
- Match the dibble hole size to the stem diameter of the cutting.
- Use as little misting as possible after sticking. Use only enough water to prevent cuttings from wilting. Mist should not wet the media until roots are formed. Adjust misting based on weather conditions such as sunny vs. cloudy weather. Some growers may wish to use spreader surfactants to better wet leaves but adjust misting accordingly.
- Water cuttings after sticking and once on the bench. Maintain moderate media moisture while cuttings are forming callus. Start drying the media once callus has formed and reduce mist. Media should be light-brown in color but not dry. Once roots form, dry media a little more, but just enough to prevent wilting. Uniform moisture from top to bottom of media is important especially when bottom heat is used.
- Careful and frequent scouting for problems. Remove and destroy any diseased cuttings.
References Bottemiller, D. 2012. Variables involved in rooting Rhododendron cuttings. Rhododendron Species Botanical Garden.
Kumar, M.G. 2016. Propagating shrubs, vines, and trees from stem cuttings. PNW 152.
Linderman, R.G., and Benson, D.M. 2014. Compendium of Rhododendron and Azalea Diseases and Pests, 2nd ed. St. Paul, MN:APS Press.

